 |  |  |
If you have decent wood working skills, this project will take a long weekend to complete (about 3-4 days).
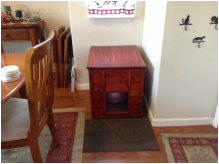
My wife and I did not like the choices for this style of cat litter enclosure online, so I built this one myself.
This build will allow for a pretty big cat litter box.
Materials (Home Depot or Lowe's):
Assembly Summary:
My wife and I did not like the choices for this style of cat litter enclosure online, so I built this one myself.
This build will allow for a pretty big cat litter box.
Materials (Home Depot or Lowe's):
- 6 nice wood boards to your liking, suggest 2 pieces at least 36" in x 72" to cut
- Top: 22" x 27"
- Front/back: 17.75" wide x 22.00" high (2 pieces)
- Sides: 23.25" long x 22.00" high (2 pieces)
- Bottom: 23.00" long x 19.00" width (note - for ease, this fits within the 1.5" post corners and not trimmed to fit them tight)
- 12 pieces 3/4" mold trim to your liking, optional for decoration, suggest 2 pieces, 10 feet long each to cut
- Front/back/sides verticals: 21.25" high (8 pieces)
- Front/back bottoms: 17.75" width (2 pieces)
- Side bottoms: 23.25" width (2 pieces)
- 4 pieces 1.5" x 1.5" wood stock for corners, suggest 1 piece, 8 feet long to cut
- Cut all 4 pieces to 22.75" long
- 2 rolls plastic (almost rubber) cabinet liner
- Furniture floor protectors (hard plastic or fuzzy)
- Table / hand saw
- Scroll / hand saw
- Hand sander, 1/4 sheet
- Staple / finishing gun - really helps a lot
- Screws, finishing nails, staples
- Wood varnish to your liking
- Polyurethane
Assembly Summary:
- Cut 6 pieces for front, back, sides, top and bottom using hand/table saw
- Cut out the "cat hold" in the front piece
- Measure out hole using pencil - 9.00" width x 9.25" high centered on the piece and about 2" from bottom
- Drill 1/2" - 3/4" hole in one of the corners and use scroll or hand saw to cut out square hole
- Using a piece of scrap wood, cut out the "half moon" using hand saw, the piece is about 4.5" radius, nail or screw to front above cat hole
- Cut 4 pieces of corners using 1.5" x 1.5"
- Create the basic box frame by assembling front, back, sides to corner stock using wood screws, for ease, I just drilled holes thru the corner stock into each wood piece and screwed them together. I used 2 screws on each side and counter-sunk each one. But you could also use corner brackets and screw the corners together from the inside.
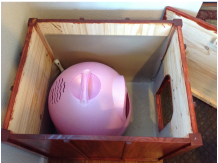
- Screw in the bottom to fix within the bottom box frame. Again, for ease, I used a bottom dimension that just simply fit within the bottom inside of the 4 corner posts (leaving a small gap front and back of the bottom frame). I also thought doing this would make it easy to broom out litter that spills onto the bottom.
- Cut to size the trim pieces for the front, back and side verticals and nail them onto the box frame using finishing nails, fit them flush with top edge
- For the front, nail the 2 trim verticals so that it just sits very slightly inside the cat hole vertical edges (so it looks a little nicer)
- Cut to size 2 more pieces of trim for the front, 1 horizontal piece above and below the cat hole
- Cut to size the trim pieces for the front, back and side bottoms and nail them onto the box frame using finishing nails
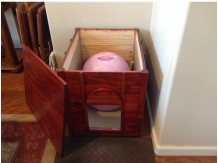
- For ease, I just press fit the top onto the box frame - it's easy to take it off and put back on for litter cleanings
- Using scrap wood, cut 4 pieces approx. 6" long x 1.5" wide
- Attach to underneath of top using 2 screws for each piece.
- For press fit to work, each piece needs to be 1.5" from the edge of each side of the top, also center each piece horizontally on the top
- Varnish the entire box, 2 - 3 coats
- Apply polyurethane, 2-3 coats
- Cut out and staple cabinet liner to inside of box, go up the sides about half way and overlap - to protect against cat urine and litter
- Apply 4 floor protectors on the bottom of each corner post
 RSS Feed
