| 
|
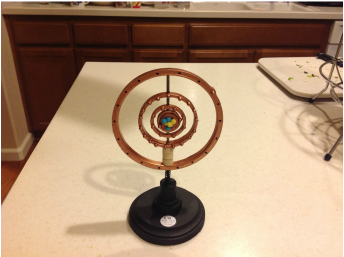
This is a relatively easy to build 3D Atom for upper grade school (6-8th) students.
If you have the tools and basic building skills, you should be able to do this in a full weekend.
The model "spins" at four different points on an simple axle.
Materials (from Home Depot, Lowes, Michael's, Hobby Shop)
4 pieces outdoor piping - we used 5" outer diameter (OD), 3" OD, 1.5" OD, 1" OD pipe, as short of pieces you can get
1 piece 3/4" pipe cap (for the center nucleus), also from outdoor piping area
6.5" long brass or copper shaft, 1/8" diameter
Small spring - 1/4" diameter by 1/2" long
3 1/2" diameter dremel buffing disks (or another small spring), find in the hardware Dremel section
1 pipe plug - 1/2 " diameter by 1" long in the outdoor piping area
Wood base - 4" diameter, found it at Michael's unpainted
About 10 - 50 colored BB's (depending which Atom you are making)
Paint
Assembly Summary:
1. Cut the 4 pieces of plastic outdoor piping into single 1/4" or 1/2" thick "slices" using a radial saw or other type of saw (this is the hardest part)
2. Use a 1/8" drill bit to drill 1/4" depth holes into the piping slices, dependent on how many "Electrons" you need on the slice "orbits" of the Atom
3. Use the 1/8" drill bit to drill center holes (one hole at the top and bottom) on each of the pipe slices for the 6.5" long copper shaft - so the 5 pieces of pipe slices and the pipe cap all rotate on the shaft properly. We found the easiest way to do this was to lay the slices down on a table, place the shaft on top of them as in the final configuration and then use a felt marker to mark the drill points.
4. Use the 1/8" drill bit to drill a vertical hole thru the 1" long pipe plug and the wood base.
5. Glue the pipe plug to the wood base, with the holes vertically aligned, let dry
6. Force fit the brass / copper shaft thru the pipe plug and wood base, it should be a tight fit
7. Put the spring on the shaft so it sits on top of the pipe plug
Steps 8 - 11 will probably have to be done several times, each try making small adjustments until you are happy with the configuration
8. Put the bottom end of the largest pipe slice onto the shaft
9. Put the 3 dremel buffing disks on the shaft (or use another spring)
10. Put the other pipe slices on the shaft in large to small order
11. Put the top of the shaft thru the top hole of the largest pipe slice
Once you're happy with the looks and rotation of the final configuration of the pipe slices:
13. Glue the BBs onto the pipe slices as needed for your Atom type
14. Paint the slices, springs, wood base as desired
15. Glue additional BBs onto the very center (smallest) pipe slice for the nucleus
16. Final assemble the slices
17. Use your computer or hand draw information about the Atom and paste to the wood base
18. Enjoy!
 RSS Feed
