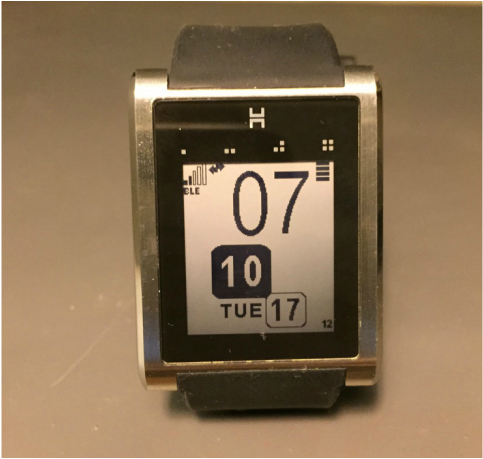
Kickstarter Hot Smart Watch - waited a little over a year for this Smart Watch. Finally received it at the very end of December 2014. It works pretty good for a first version device. Battery is great. I would call it a basic Smart Watch for where the industry is right now - time, custom clock faces, email, SMS, Twitter, Facebook notifications, mini-applications, nice integration with Siri (iPhone). I like the watch because I can make / receive phone calls with it and see notifications without having to pull out my iPhone all the time.
0 Comments
This was my Instructables contest entry for the Wood contest. I was able to find a way to use my new Silhouette Portrait to cut thin (1 mm) veneer wood. It turned out pretty well. The Silhouette cut about 80% of the cuts. Then I just folder and glued it together. About 3 hours to complete including glue dry time.
(Visit My Instructable for details) This is my 1925 Remington Portable typewriter that I converted to a fully functioning USB keyboard. Kits are available for the conversion from usbtypewriter.com along with an Instructable on how to do the conversion. It took me about 8 full hours to convert mine and it works very well, albeit a little hard to type since it is a 1925 typewriter! I purchased the typewriter on eBay.
I was a Kickstarter supporter for the new PowerUp 3.0 iPhone controlled paper airplane. Its a little tricky to learn how to fly it at first, but is a lot of fun to fly. Visit the PowerUp Toys Website if interested. (Visit http://www.poweruptoys.com/collections/frontpage) The drone on the left actually flies well and kind of looks like an Incredibles attack drone. I simply took my AR Drone 2.0 and took apart an old military style R/C helicopter (that I bought from a rummage sale, didn't work) and retro-fitted the plastic guns and the little military pilot onto the AR Drone inside hull. I also had build a little platform out of some scrap plastic for the "pilot" to sit into it.
The drone on the right, I could never get that to work, it was too heavy. I attempted to retro-fit a small air-soft gun from a R/C tank onto the AR Drone inside hull. Everything worked, I could even fire the BB's from a remote trigger, but again, it was just a little too heavy. If you have decent wood working skills, this project will take a long weekend to complete (about 3-4 days).
My wife and I did not like the choices for this style of cat litter enclosure online, so I built this one myself. This build will allow for a pretty big cat litter box. Materials (Home Depot or Lowe's):
Assembly Summary:
This is a relatively easy to build 3D Atom for upper grade school (6-8th) students.
If you have the tools and basic building skills, you should be able to do this in a full weekend. The model "spins" at four different points on an simple axle. Materials (from Home Depot, Lowes, Michael's, Hobby Shop) 4 pieces outdoor piping - we used 5" outer diameter (OD), 3" OD, 1.5" OD, 1" OD pipe, as short of pieces you can get 1 piece 3/4" pipe cap (for the center nucleus), also from outdoor piping area 6.5" long brass or copper shaft, 1/8" diameter Small spring - 1/4" diameter by 1/2" long 3 1/2" diameter dremel buffing disks (or another small spring), find in the hardware Dremel section 1 pipe plug - 1/2 " diameter by 1" long in the outdoor piping area Wood base - 4" diameter, found it at Michael's unpainted About 10 - 50 colored BB's (depending which Atom you are making) Paint Assembly Summary: 1. Cut the 4 pieces of plastic outdoor piping into single 1/4" or 1/2" thick "slices" using a radial saw or other type of saw (this is the hardest part) 2. Use a 1/8" drill bit to drill 1/4" depth holes into the piping slices, dependent on how many "Electrons" you need on the slice "orbits" of the Atom 3. Use the 1/8" drill bit to drill center holes (one hole at the top and bottom) on each of the pipe slices for the 6.5" long copper shaft - so the 5 pieces of pipe slices and the pipe cap all rotate on the shaft properly. We found the easiest way to do this was to lay the slices down on a table, place the shaft on top of them as in the final configuration and then use a felt marker to mark the drill points. 4. Use the 1/8" drill bit to drill a vertical hole thru the 1" long pipe plug and the wood base. 5. Glue the pipe plug to the wood base, with the holes vertically aligned, let dry 6. Force fit the brass / copper shaft thru the pipe plug and wood base, it should be a tight fit 7. Put the spring on the shaft so it sits on top of the pipe plug Steps 8 - 11 will probably have to be done several times, each try making small adjustments until you are happy with the configuration 8. Put the bottom end of the largest pipe slice onto the shaft 9. Put the 3 dremel buffing disks on the shaft (or use another spring) 10. Put the other pipe slices on the shaft in large to small order 11. Put the top of the shaft thru the top hole of the largest pipe slice Once you're happy with the looks and rotation of the final configuration of the pipe slices: 13. Glue the BBs onto the pipe slices as needed for your Atom type 14. Paint the slices, springs, wood base as desired 15. Glue additional BBs onto the very center (smallest) pipe slice for the nucleus 16. Final assemble the slices 17. Use your computer or hand draw information about the Atom and paste to the wood base 18. Enjoy! This was a pretty easy project. About 40 hrs total. We purchased a local classic Schwinn reproduction model from 1997, replaced the green fenders with chrome fenders (eBay), added the front and rear fender lights appropriate for this style of bike (eBay) and then just touched it up a bit (polish and some paint). Done.
This cake is an easy small project for a day or the weekend with your kids.
1. Purchase 1 box Tie Dye Cake from Target. One box will make a two layer cake. 2. We purchased White Fondant and some sugar decorations items also 3. Make the mix according to the box instructions for two layer cake
4. Cook the cake and allow completely to cool 5. We "dirty iced" the cake in white frosting 5. We rolled out the fondant and put it over the cake 6. Then put the pre-made sugar decordations on the fondant |
Steve UhlWelcome to my projects blog! I like to make and tinker with a lot of different ideas. I like to use Adobe Illustrator / Photoshop, my Die Cutting machines (Silhouette Portrait and Cricut Explore), my 3D Printer and my garage workshop to build my projects. Archives
January 2018
Categories |